Imagine a world where your daily exercise does more than just keep you fit. What if those miles on the bike could actually light up your living room, charge your phone, or power essential appliances? That’s the empowering promise of DIY bike generator builds and projects. Far from being a niche hobby, constructing your own pedal-powered electricity source offers a tangible step towards energy independence, emergency preparedness, and a greener lifestyle. It’s a project that marries mechanical ingenuity with electrical savvy, transforming a common bicycle into a personal power plant.
Ready to harness your own human power? Let’s pedal through the essentials.
At a Glance: Your Pedal-Powered Journey Ahead
- Why Build One? Gain energy independence, reduce your carbon footprint, prepare for emergencies, and get fit simultaneously.
- Core Components: You'll need a bicycle, a stable base, a power transmission system (belt and pulley), a generator (DC motor, NOT a car alternator!), and electrical regulation/storage (diode, fuse, battery, inverter).
- Building It: Involves constructing a sturdy stand, mounting the generator, connecting it to your bike wheel with a belt, and carefully wiring the electrical components.
- Key Safety: Always use a diode and a fuse to protect your system and prevent battery damage or fire hazards.
- Power Potential: Best for charging small devices, running LED lights, or as backup power for critical electronics during outages. Don't expect to power your entire house.
Why Pedal Power? The Appeal of Your Own Electricity
The idea of a bike generator might conjure images of post-apocalyptic survival, but its utility extends far beyond doomsday prepping. For many, it's about reclaiming a bit of autonomy in a grid-dependent world. Think about it:
- Emergency Preparedness: When the grid goes down, your lights, communication, and charging capabilities often go with it. A bike generator provides a reliable, human-powered backup.
- Off-Grid Living & Camping: For cabins, RVs, or remote campsites, a pedal generator offers a silent, sustainable way to produce electricity without relying on noisy gas generators.
- Sustainable Living: Reduce your reliance on fossil fuels and contribute to a cleaner environment. Every watt you pedal yourself is a watt not drawn from the grid's often carbon-intensive sources.
- Fitness & Productivity: Combine your workout with a tangible output. The mental satisfaction of charging your phone while breaking a sweat is incredibly motivating.
- Educational Project: It’s a fantastic hands-on lesson in physics, mechanics, and electrical engineering, perfect for students, makers, and curious minds alike.
Before diving headfirst into the build, it's helpful to grasp the fundamental principles. A bike generator works by converting the mechanical energy of your pedaling into rotational energy, which then spins a generator (an electric motor working in reverse) to produce electricity. This electricity can be stored in a battery or converted to power standard household devices. For a deeper dive into the concept, you might explore Your complete bike generator guide.
Gathering Your Gear: Essential Components for Your Build
Building a DIY bike generator is a journey of assembling several distinct systems that work in harmony. You'll need to source or construct each of these core components. Let's break down what's needed, why it's important, and what to look for.
The Bicycle: Your Mechanical Powerhouse
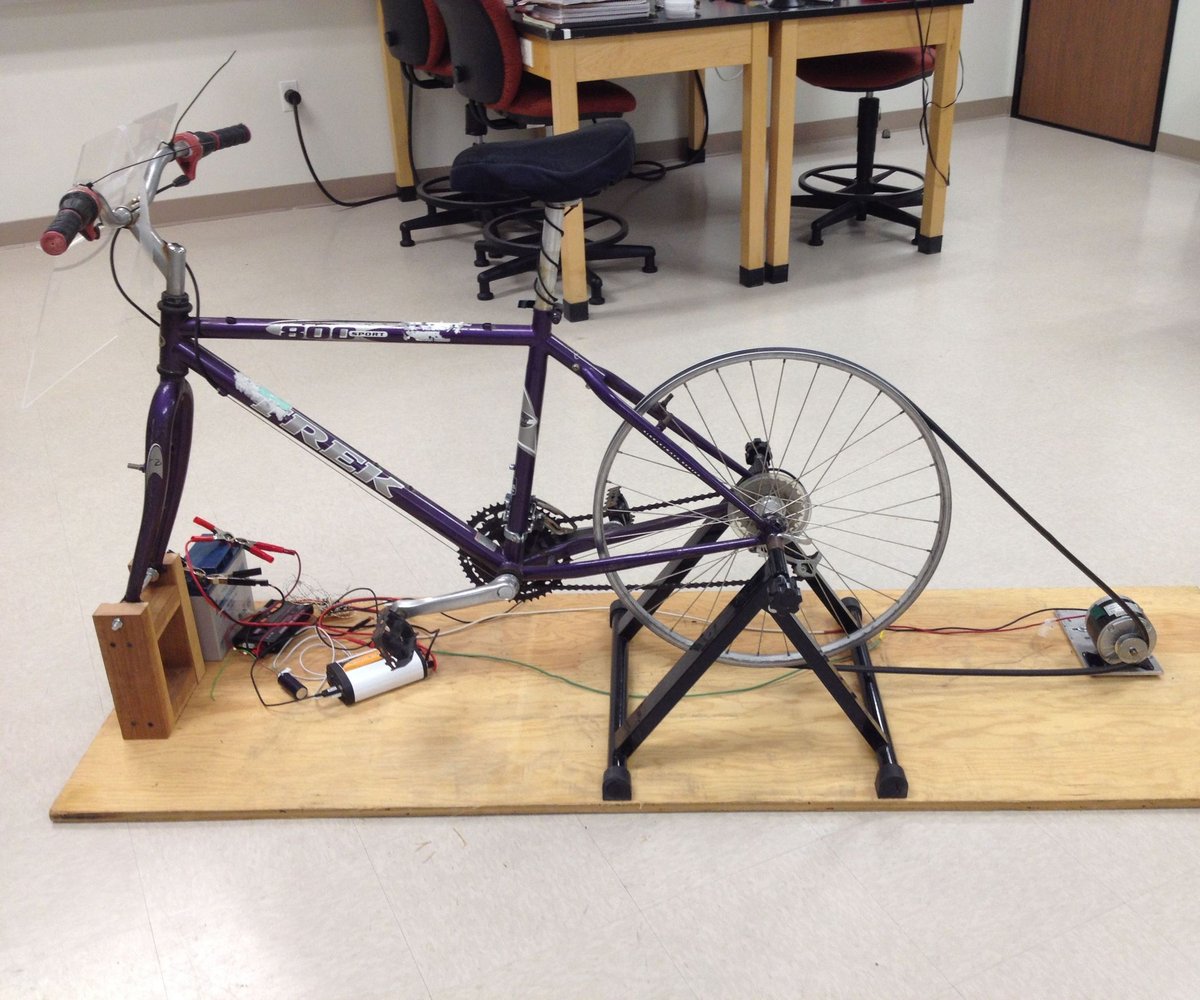
Any type of bicycle can serve as the foundation for your generator. Multi-speed road bikes, sturdy mountain bikes, or even dedicated exercise bikes can be adapted. The key is that the rear wheel (or a flywheel attached to the crank system) needs to spin freely and be able to transfer its rotational energy. If you're using a standard bike, the rear wheel will be elevated off the ground.
The Base/Stand: Stability is Key
Your bicycle needs a stable platform to ensure it doesn't tip over while you're pedaling furiously. This stand will elevate the rear wheel, allowing it to spin without friction from the ground.
- DIY Wooden Base: This is a popular and cost-effective option. You'll typically use sturdy wooden planks (e.g., two 50-inch x 6-inch x 2-inch for the main frame, shorter planks for cross-braces and uprights). You'll need a saw, nails, screws, a Phillips screwdriver, hammers, and possibly metal L-corner braces for reinforcement.
- Bicycle Trainer Stand: An existing bicycle trainer can be a convenient shortcut, providing a ready-made platform and wheel-clamping mechanism.
- Alternative Support: For a more rustic setup, 2x4 beams, plywood, or even cinder blocks can be used to stabilize the frame, though they might require more improvisation to secure the bike safely.
The Generator: Where Mechanical Becomes Electrical
This is the heart of your system, converting the mechanical energy from your pedaling into usable electricity.
- Recommended: Permanent Magnet DC Motor: Look for a motor rated for DC output, often found in old treadmills, mobility scooters, or even electric go-karts. A 24-volt motor rated for 600-1800 rpm is a good starting point. For instance, a 24V 1800 rpm motor rated for 1/3 horsepower can often produce around 12 volts at 900 rpm, which is ideal for charging a 12V battery. These motors are efficient because they use permanent magnets, so they don't consume power just to create a magnetic field.
- Crucial Warning: Avoid Car Alternators! While seemingly powerful, car alternators are a poor choice for bike generators. They require extremely high RPMs (3,000-10,000 rpm) to generate significant power. More importantly, they use an electromagnet, which consumes about one-third of your pedaling effort just to magnetize itself, significantly reducing your net power output. Stick with permanent magnet DC motors.
Power Transmission: Connecting the Wheel to the Generator
You need a way to transfer the spinning motion of your bicycle's rear wheel to the generator's shaft.
- Belt and Pulley System: This is the most common and effective method.
- Belts: A fan belt (V-belt) from an automotive store is a readily available option. Keep in mind that V-belts can have around 20% friction loss. For higher efficiency (around 95%), consider a tooth belt (like those used in timing belts or some industrial applications), though these can be harder to source and implement with a standard bicycle wheel.
- Pulleys: The bicycle wheel acts as one large pulley. You'll need a smaller pulley to attach to your generator shaft. The ratio between the wheel's diameter and the generator's pulley diameter will determine how many times the generator spins for each rotation of your bike wheel.
- Enhancements: For serious power output, consider adding lever arms to your crankset, which can increase power by over 50%. Elliptical sprocket wheels can also optimize the gear ratio during different phases of your pedal rotation.
The Electrical Brains: Regulation, Storage & Safety
Once you generate electricity, you need to manage it. This system ensures your power is clean, safe, and stored efficiently.
- Voltage Regulator: This device limits the current flow to your battery once it reaches a full charge, preventing overcharging and damage.
- Diode: Think of a diode as a one-way valve for electricity. It's crucial for preventing current from flowing back from your battery to the generator when you stop pedaling, which could drain your battery or damage your generator. Use a diode rated at a minimum of 25 amps and at least 35 volts. It's placed in the positive line between the generator and the battery.
- Fuse: A safety device, the fuse protects your components from current surges. If too much current tries to pass, the fuse "blows," creating an open circuit and preventing damage or fire. Use a 25-amp fuse, placed in the positive line between the diode and the battery.
- Battery: Your energy storage unit. A 12-volt deep-cycle battery (like those used in RVs or marine applications) is highly recommended. These are designed for repeated deep discharges, unlike car starter batteries. Connecting smaller batteries (like those in cell phones) directly can be done with appropriate charging circuits. For some applications, you might even avoid a battery entirely if you're directly powering a mechanical load or a specific device.
- Switch: A simple on/off switch allows you to disconnect the generator from the battery when not in use, preventing any minor parasitic drain or accidental engagement.
Converting for Convenience: Power Conversion
Unless you're only powering DC devices (like 12V LED lights or charging phones via a DC car charger), you'll need an inverter.
- Inverter: This device converts the direct current (DC) from your battery into alternating current (AC), which is what standard wall outlets provide (e.g., 12V DC to 110V AC in the US). Inverters vary in efficiency (60-90%) and must be sized to handle the peak electrical load of the devices you plan to power. If you're running non-electronic DC devices (like specific lamps), an inverter isn't necessary.
The Lifelines: Wiring
- Wire Gauge: Use 10-gauge copper stranded wire for lower resistance and better current handling. Avoid solid copper wire, which can be brittle and prone to breaking with vibration.
Tools for the Build
Beyond your basic toolbox, you'll need a few specialized items:
- Saw (for wood)
- Nails, screws, hammer, Phillips screwdriver
- Nail puller (for mistakes!)
- Soldering iron and solder (for secure electrical connections)
- Multimeter (absolutely essential for testing voltage and continuity)
Building Your Power Plant: Step-by-Step Construction Guide
This is where your vision takes physical form. Follow these steps carefully to construct a safe and functional DIY bike generator.
Step 1: Constructing Your Sturdy Base
Start with the foundation of your build.
- Lay the Main Beams: Place two 50-inch wooden planks parallel to each other on a flat surface. These will be the main rails of your stand.
- Add Cross-Braces: Cut a 24-inch plank into two equal 12-inch pieces. Nail or screw these horizontally across the 50-inch planks, one near each end, to form a stable rectangular base.
- Position the Bike: Temporarily place your bicycle on the base. Mark the exact location where your rear wheel's cassette sprocket sits. This is where your generator will be aligned.
- Create Uprights for the Bike: Cut two triangular pieces from leftover wood (e.g., from the remaining 24-inch plank). These will serve as vertical supports to hold the rear wheel's axle. Fix them securely with screws and metal L-corner braces on either side of your marked sprocket location. The goal is to cradle the rear axle firmly.
Step 2: Securing Your Ride
Your bike needs to be immovable, except for the spinning rear wheel.
- Elevate the Rear Wheel: Ensure the stand lifts the rear wheel completely off the ground, allowing it to spin freely without obstruction.
- Lock the Front Wheel: Install a lock, clamp, or brace at the front of your wooden base to prevent the front wheel from swiveling or moving. This prevents the bike from steering itself off the stand while you're pedaling.
Step 3: Integrating the Generator & Belt System
Now, connect the mechanical power source to your electrical generator.
- Prepare the Bike Wheel: If necessary, carefully disassemble the rear wheel hub to slide the fan belt onto the wheel, then reattach the wheel securely to the stand. This ensures the belt won't slip off easily.
- Mount the Generator: Position your permanent magnet DC motor on the wooden base so that its pulley is directly in line with the bicycle's rear wheel. Mount it firmly using screws or bolts.
- Connect the Belt: Route the fan belt from the rear bicycle wheel to the pulley on your generator.
- Tension the Belt: This is crucial for efficient power transfer. You'll need a tensioning mechanism. A common DIY approach is to create a clamp-like metal piece with a bolt and nut. Secure this to the base and use it to adjust the generator's position slightly, pulling it away from the bike wheel until the belt is taut but not overly tight. The belt should have a small amount of play but not slip under load.
Step 4: Wiring It All Up: The Electrical Connections
This step requires precision and attention to detail. Refer to your multimeter to test connections as you go.
- Generator to Regulator: Connect the positive (red) wire from your generator/motor to the input of your voltage regulator. Connect the negative (blue) wire from the generator/motor to the regulator's negative input.
- Regulator Switch Integration (if applicable): If your regulator has a separate "switch" or "field" terminal, connect one end of your manual switch to the same generator positive wire, and the other end to the B+ terminal on your voltage regulator. If your motor has a separate field terminal (DF), connect a wire from your regulator's DF output to this terminal. (Many simple permanent magnet DC motors won't have a separate field terminal, simplifying this step.)
- Diode Installation: This is a critical safety component.
- Locate the positive output wire from your voltage regulator (or directly from the generator if no regulator is used for a simple charge).
- Install the 25A, 35V+ diode in this positive line. Crucially, ensure the diode's stripe (cathode) faces towards the battery. This means current can only flow from the generator to the battery, not the other way around.
- Connect the positive wire from the generator/regulator to the diode's anode (non-striped end), and then connect the diode's cathode (striped end) to the next component in the positive line.
- Fuse Installation: For safety, a fuse must follow the diode.
- Connect the positive wire coming out of the diode to one side of the 25A fuse holder.
- Connect another positive wire from the other side of the fuse holder to the positive terminal of your battery.
- Battery Connection:
- Connect the positive wire (coming from the fuse) to the positive terminal of your 12-volt deep cycle battery.
- Connect the negative wire (from the generator/regulator) directly to the negative terminal of your battery.
- Always connect positive to positive, and negative to negative.
- Inverter Connection (if needed):
- If you require AC power, connect your inverter directly to the battery terminals.
- Connect the inverter's positive cable to the battery's positive terminal and its negative cable to the battery's negative terminal. Ensure these connections are secure.
Step 5: The Moment of Truth: Testing Your System
With all connections made, it's time to see your creation in action.
- Initial Voltage Check: Before connecting any loads, use your multimeter to check the voltage across your battery terminals. Then, with the system connected (and the generator spinning, if possible by hand) check the voltage output from the regulator before the diode to ensure it's generating power.
- Pedal Power: Start pedaling at a moderate, consistent pace.
- Measure Output: With your multimeter, check the voltage at the battery terminals while you're pedaling. You should see it rise and ideally stabilize around 14-15 volts if the battery is charging correctly and the regulator is functioning.
- Test a Load:
- DC Devices: Connect a small 12-volt DC light bulb directly to the battery terminals (or via an appropriate DC outlet connected to your battery).
- AC Devices (with inverter): Turn on your inverter (if using). Plug in a small 110-volt AC device, like a low-wattage lamp or phone charger, into the inverter's outlet. Pedal and observe if it powers up.
- Observe & Adjust: Monitor your readings. If voltage isn't rising, recheck your wiring. If the belt slips, adjust tension.
Optimizing Your Output: Tips for Efficiency & Longevity
Building the generator is just the first step. To make the most of your pedal-powered system, consider these tips:
- Match Your Load: Human power is limited. Understand that you won't be powering an air conditioner or a clothes dryer. Focus on high-value, low-wattage tasks like charging phones/laptops, running LED lights, or powering small electronics. Pacing your pedaling to match the load can significantly improve efficiency and reduce strain on the system (and you!).
- Maintenance Matters: Regularly check your belt tension, ensuring it's not too loose (slippage) or too tight (excessive friction). Keep all electrical connections clean and tight. Inspect wiring for fraying or damage.
- Gear Selection: On a multi-speed bike, experiment with different gears to find the optimal balance between pedaling effort and generator RPMs. A higher gear will spin the wheel faster, potentially increasing generator output, but will require more effort.
- Flywheel Benefit: If your setup allows, adding a heavy flywheel to the generator shaft can smooth out power delivery, making pedaling feel more consistent and less "jerky."
- Ventilation: Ensure your generator and inverter have adequate airflow to prevent overheating, especially during extended use.
Beyond the Basics: Projects & Applications for Your Bike Generator
Once your bike generator is operational, a world of possibilities opens up. Here are a few practical applications:
- Charging Stations: Create a dedicated charging hub for phones, tablets, and even laptops. You can integrate USB charging ports directly into your system.
- Emergency Lighting: Power an array of energy-efficient LED lights during a blackout.
- Small Appliance Power: Run a fan, a radio, or even a small blender (for that post-workout smoothie!).
- Educational Demonstrations: Use your generator as a compelling teaching tool for renewable energy and basic electricity.
- Off-Grid Power for Remote Sheds/Workshops: Provide supplemental power for tools or lighting where grid access is limited.
Common Questions & Troubleshooting
Even the most seasoned DIYer encounters bumps in the road. Here are some common questions and advice:
- "How much power can I generate?"
You can typically sustain 75-150 watts for an hour or more, depending on your fitness level. Sprinters might briefly hit 300-400 watts. This is enough for charging multiple phones, a laptop, and several LED bulbs simultaneously. - "My battery isn't charging. What's wrong?"
First, check all your wiring connections, especially the diode direction and fuse integrity. Use a multimeter to test voltage output from the generator, then through the diode, and finally at the battery terminals. Ensure your voltage regulator is set correctly for a 12V battery. - "Why is my generator getting hot?"
Overheating usually indicates excessive load or friction. Check belt tension – a belt that's too tight or too loose can cause friction. Ensure the generator is sized appropriately for the load you're attempting to draw. Insufficient ventilation can also contribute. - "Can I really power a refrigerator?"
Generally, no, not with a typical DIY bike generator. Refrigerators require significant peak starting power and sustained wattage that far exceeds what a human can consistently produce. Focus on smaller, low-power devices. - "My bike trainer setup doesn't spin the generator fast enough."
You might need to adjust your gear ratio. Consider a smaller pulley on your generator or a larger "pulley" on your bike wheel to increase the generator's RPMs for each pedal rotation.
Pedal Towards a Powerful Future
Building a DIY bike generator is more than just a project; it's an investment in your resilience, your understanding of energy, and your personal power. From the satisfaction of assembling the components to the thrill of seeing a light bulb glow from your own effort, the journey is incredibly rewarding.
You now have the knowledge and steps to begin your own DIY bike generator builds and projects. Whether you're aiming for off-grid self-sufficiency, emergency backup, or simply a fascinating way to combine fitness with utility, your pedals are ready to power your future. So grab your tools, dust off that old bike, and start generating!